Resource Centre
Our Resource Centre has been designed for all Dog Owners: from Household Dog Owners, Professional Dog Trainers, Tracking and Hunting Enthusiasts and everyone in between, we supply the most relevant information on how to get the best from our products and your dog.
Our range is designed for all dog breeds, sizes and temperaments, so understanding what you need and why is key.
Discover how to get the best from your dog today with detailed video library covering : e-Collar Training Videos, Professional Dog Trainer Tips or Product Troubleshooting, Bark Control, Invisible Fence, Dog Tracking & Technical Advice!
Click on the buttons below to watch our video library.
Dog Training Clips
Preparation for Training
Learn more How to introduce shock collar to your dog.
A Farmers perspective on Do dog shock collar work?
Read more about How shock collars work
Trainers Tips (Train your dog from professional dog trainers)
Remote training collars provide the dog owner with the ability to communicate with their dog at distance. From the family pet to working and hunting dogs. DOGMASTER Trainers provide expert advice for every dog owner’s needs. How to use a dog training collar and maximise your results: The first thing you need to know is that these systems are not designed purely as a discipline tool. When looking at training collar, always consider the setting in which you are going to use the collar, your dog’s personality and temperament.
Learn more about Benefits of training with E-Collars
Read more about E-Collars and rewards-based training
Get ready for the dog park with our article Using E-Collar to prepare for the dog park
With this in mind, where possible, we recommend that you follow the following steps:
- Read through and follow all manufacturer’s instructions
- Fit the training collar properly onto your dog
- Start the training in a yard, with the remote control at the lowest level press the continuous button when your dog misbehaves. If no response, go up a level and press the continuous button again. Continue this process until you see the dog receive a little niggle. This is your training reinforcement level.
- Once this level is set: you press the continuous button, give a command, as the dog responds release the button, praise the dog on completion of the task. The dog will then realise by obeying they can remove the niggle and be rewarded. Your dog will now look to you more for direction and reassurance.
- If the dog is displaying unwanted behaviour, simply press the boost button for a second and give no verbal command. The dog associates the stronger correction with the behaviour.
Bark Control
DOGMASTER recognises the growing need for bark control collars to help owners control nuisance and excessive barking that often causes issues with neighbours, councils etc. This is never a pleasant situation to be faced with when owning a dog. Our beloved pets are all different, with different motivations and temperaments. At DOGMASTER, we give you expert advice on choosing the right product for your individual situation and needs.
Learn more about bark collars in our blog post How to choose right bark collar for your dog
Read more about bark control in our article Understanding why dogs bark excessively
Invisible Fence
Many dog owners face the reality of their dogs escaping from yards to go on adventures. DOGMASTER acknowledges the need for quality containment fences to give dog owners peace of mind knowing their animals are not roaming the streets when they are not home. This not only keeps your dogs safe, but also stops all the problems arising from wandering dogs.
Learn more How does an invisible dog fence work
Read more about Setting up a containment fance
How does a containment fence work?
Invisible Dog Fences also known as Radio Fences consist of a loop of copper insulated wire connected to a radio transmitter. The wall mounted transmitter plugs into a power socket and emits a radio field that travels around the loop wire. The radio field can be adjusted in radius at the Wall transmitter approximately a ½metre to 3 metres in radius from the wire. Your pet wears a lightweight receiver collar that detects the radio field and alerts them via a warning tone as they near the boundary.
If your dog enters the radio field, they will receive a mild electronic pulse very much like that of a Tens Machine used by a Physiotherapist to massage muscles. This electronic pulse is harmless but startling enough to act as a deterrent to prevent your pet from escaping or challenging the existing boundaries of your property. Variable correction collars are available for dogs with stubborn tendencies.
The Containment Fence makes it easy to train your pet!
In order to form correct & consistent behaviour, train your pet to retreat back into the yard upon nearing the training flags, hearing the warning tone (Dogtra Fence by Vibration) and receiving the electronic pulse (auto or manual rise output).
This initial association training which takes approximately 15 minutes a day for up to 14 Days.
Remember to walk your dog within the yard to show them it is safe within the boundary.
This establishes the yard as a positive safe area & challenging the boundary as negative.
After the training period the collar reinforces the initial association training over and over until your pet is conditioned to stay within the area. Potentially without need for the collar!
There are several ways to allow your dog to leave the property. Give them permission to leave the property by removing the containment collar or by switching the radio field off at the transmitter.
Then using a regular dog collar coupled with a release command, lead or in a vehicle, help them associate it is OK to cross the boundary with you, “On Your Terms with Your Permission”
You can train as many dogs as you want on the same system.
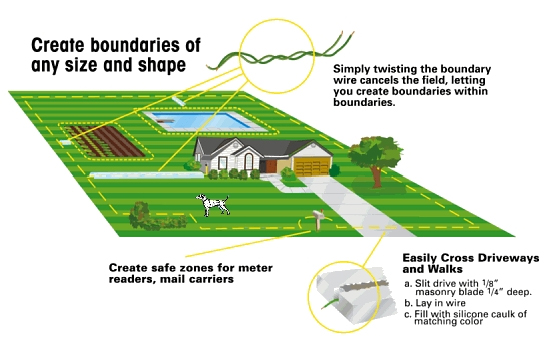
In most situations the boundary wire can be attached to existing timber or wire fencing with cable ties or buried underground approximately 1-2 inches deep across gate ways , drive ways or through expansion joints in concrete held in place by corking compound. (Beware: colourbond, tin & galvanized metal sheeting may require the wire to be placed in the ground in front of the fence in order to keep the radio field clear of metal sheeting & avoid inconsistent radio fields.

4 Steps to contain your dogs
1. Laying out the System / Basic Planning Tips:
The boundary wire must make a continuous loop back to the transmitter.
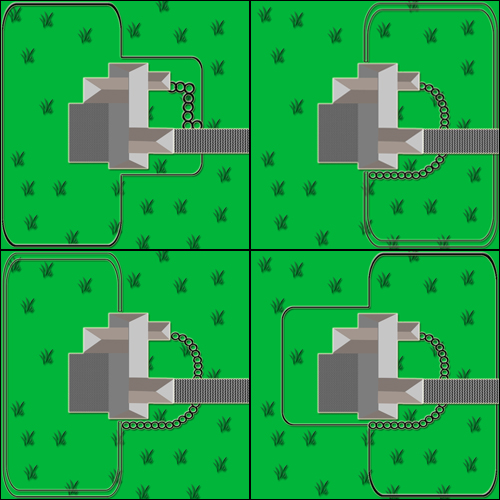
- Make a layout that is suitable for your yard. Sample layouts are provided.
- Always round the corners of your boundary with the wire. Sharp corners will distort the signal.
- Use a double loop layout to contain your pet on one side of your home. (Refer to Double Loop diagrams 1& 4 over the page)
- When installing a double loop, the wire must be spaced three to five feet apart to avoid cancelling the signal.
- The transmitter will transmit a signal from approximately half a metre to 3 metres on either side of the boundary wire. Be sure to leave enough area so that your dog can move about freely within the safe area boundaries.
2. Install your system
- Locate the transmitter
- Layout the boundary wire
- Connecting wire to the transmitter
- Splicing the wire if you need more than 150 metres of wire
- Test the boundary
- Burying the wire
- Crossing hard surfaces:
- Set the boundary width
- Testing the receiver

3. Place collar on your dog correctly
With your dog standing (not sitting) place the receiver on your dog’s neck, make sure it is positioned where the two contact points are touching your dog’s skin. If your dog’s hair is so thick that it keeps the contact points from touching your dog’s skin, you might want to use the longer contact points that are supplied with your system.
4. Training your dog for 2 weeks
Place the collar on your dog's neck and allow your dog to run around the yard while the transmitter is unplugged from the wall, so your dog can grow comfortable with wearing the new collar.
Train up to 3 times a day in sessions of 10 to 15 minutes for good results. Make sure that the flags are positioned where the tone begins (not directly on the boundary wire).
Place the collar receiver on your dog with the dog's regular collar attached to a leash.
Walk your dog towards the boundary line like you're taking the dog for a walk. Upon hearing the collar beep at the flag line, retreat your dog back a few metres. When doing this, reward your dog and make it appear that it's a game. Making it fun and positive for the dog will speed the learning process.
Repeat step 4 until your dog retreats without guidance.
After your dog has mastered retreating from the tone & the flags, it is time to give your dog a correction. Keep the leash on your dog and run towards the boundary line, making sure that you and your dog go into the field far and long enough to receive a correction.
When the correction is felt by your dog retreat back into the yard where your dog knows that it is safe. You will only get one shot at this each session. Watch for signs of your dog lunging forward to try to break through the boundary system. If your dog does this, repeat the above steps until your dog runs back to the safe area on its own. The Dog is not to be released in the yard unattended until all steps of the training are complete & the dog is respecting the boundary consistently without assistance.
Dog Tracking
Whether you are a hardcore hunter or just like getting away camping with your best mate, Dog tracking systems are becoming increasingly more versatile and are a must when out in the field. With the ability to track up to 20 dogs at once with no mobile coverage, these systems are state of the art. Some models having SOS features gives peace of mind that you are equipped for any situation.
Technical Advice and Troubleshooting
We take all pets and working dogs into consideration and stress the point that electronic dog collars / e-collars cause no harm to the dog if used correctly. Any dog training collar should NOT be left on the dog for more than 8 to 10 hours per day to avoid any potential irritation to the dog’s skin. See our page on E-Collar Safety for more information.
LATEST NEWS & TIPS
The question. “what is the best bark control collar for my dog?” is asked on many occasions. We offer a number of different anti bark collars options to suit different breeds and temperaments of dogs’ and most importantly to give the confidence to purchase the correct bark control collar.
We understand that all dogs bark – it's their method of communication in the canine world. A barking dog could be telling a potential threat to back off, staking claim to their territory, or simply letting other dogs know of their whereabouts. While a dog barking to let their owner know of a person approaching the house or when they hear a strange sound may serve as a useful alarm system, excessive barking can become an issue, especially if you have neighbours close by who find the barking less useful and more annoying.
Dog Training is at the heart of what we do, so we regularly update our blog on different tips, news and ideas to help you become a better pet parent. You can read out latest blogs by clicing the button below.

